Your Cart is Empty
~ Waiting List in Operation ~ Please Ask Before Ordering ~
~ Personalised jewellery to treasure forever ~
~ Waiting List in Operation ~ Please Ask Before Ordering ~
~ Personalised jewellery to treasure forever ~

How To Make A Fingerprint Necklace at Home
January 22, 2022 38 min read
Welcome to my complete Silver Fingerprint Jewellery tutorial - along with 10 instructional videos!
Over the past 15 years, I've lost count of the number of times I've been asked how to do this.
Finally, I got around to it!
So, in this blog and series of videos I will slowly take you through each of the steps you need to make a silver fingerprint necklace using a magical clay-like material called silver clay.
You don't need to make a neckace. You can easily use the same instructions to make a fingerprint charm or a bigger keyring with 2, 3 or more fingerprints. They would all be made the same way.
If you stick with me until the end, you will be able to add any fingerprint, from an adult or a child and to a silver necklace, to make a gift for a special someone or to make yourself a personalised keepsake.
I will show you how to take a fingerprint impression directly into a piece of rolled out silver clay.
I will also show you how to take a mould of a fingerprint using silicone impression material, how to make a reverse mould of that fingerprint and then how to press your moulded fingerprint into a piece of silver clay – completely eliminating wiggly and slightly uncooperative small people from your creative making process.
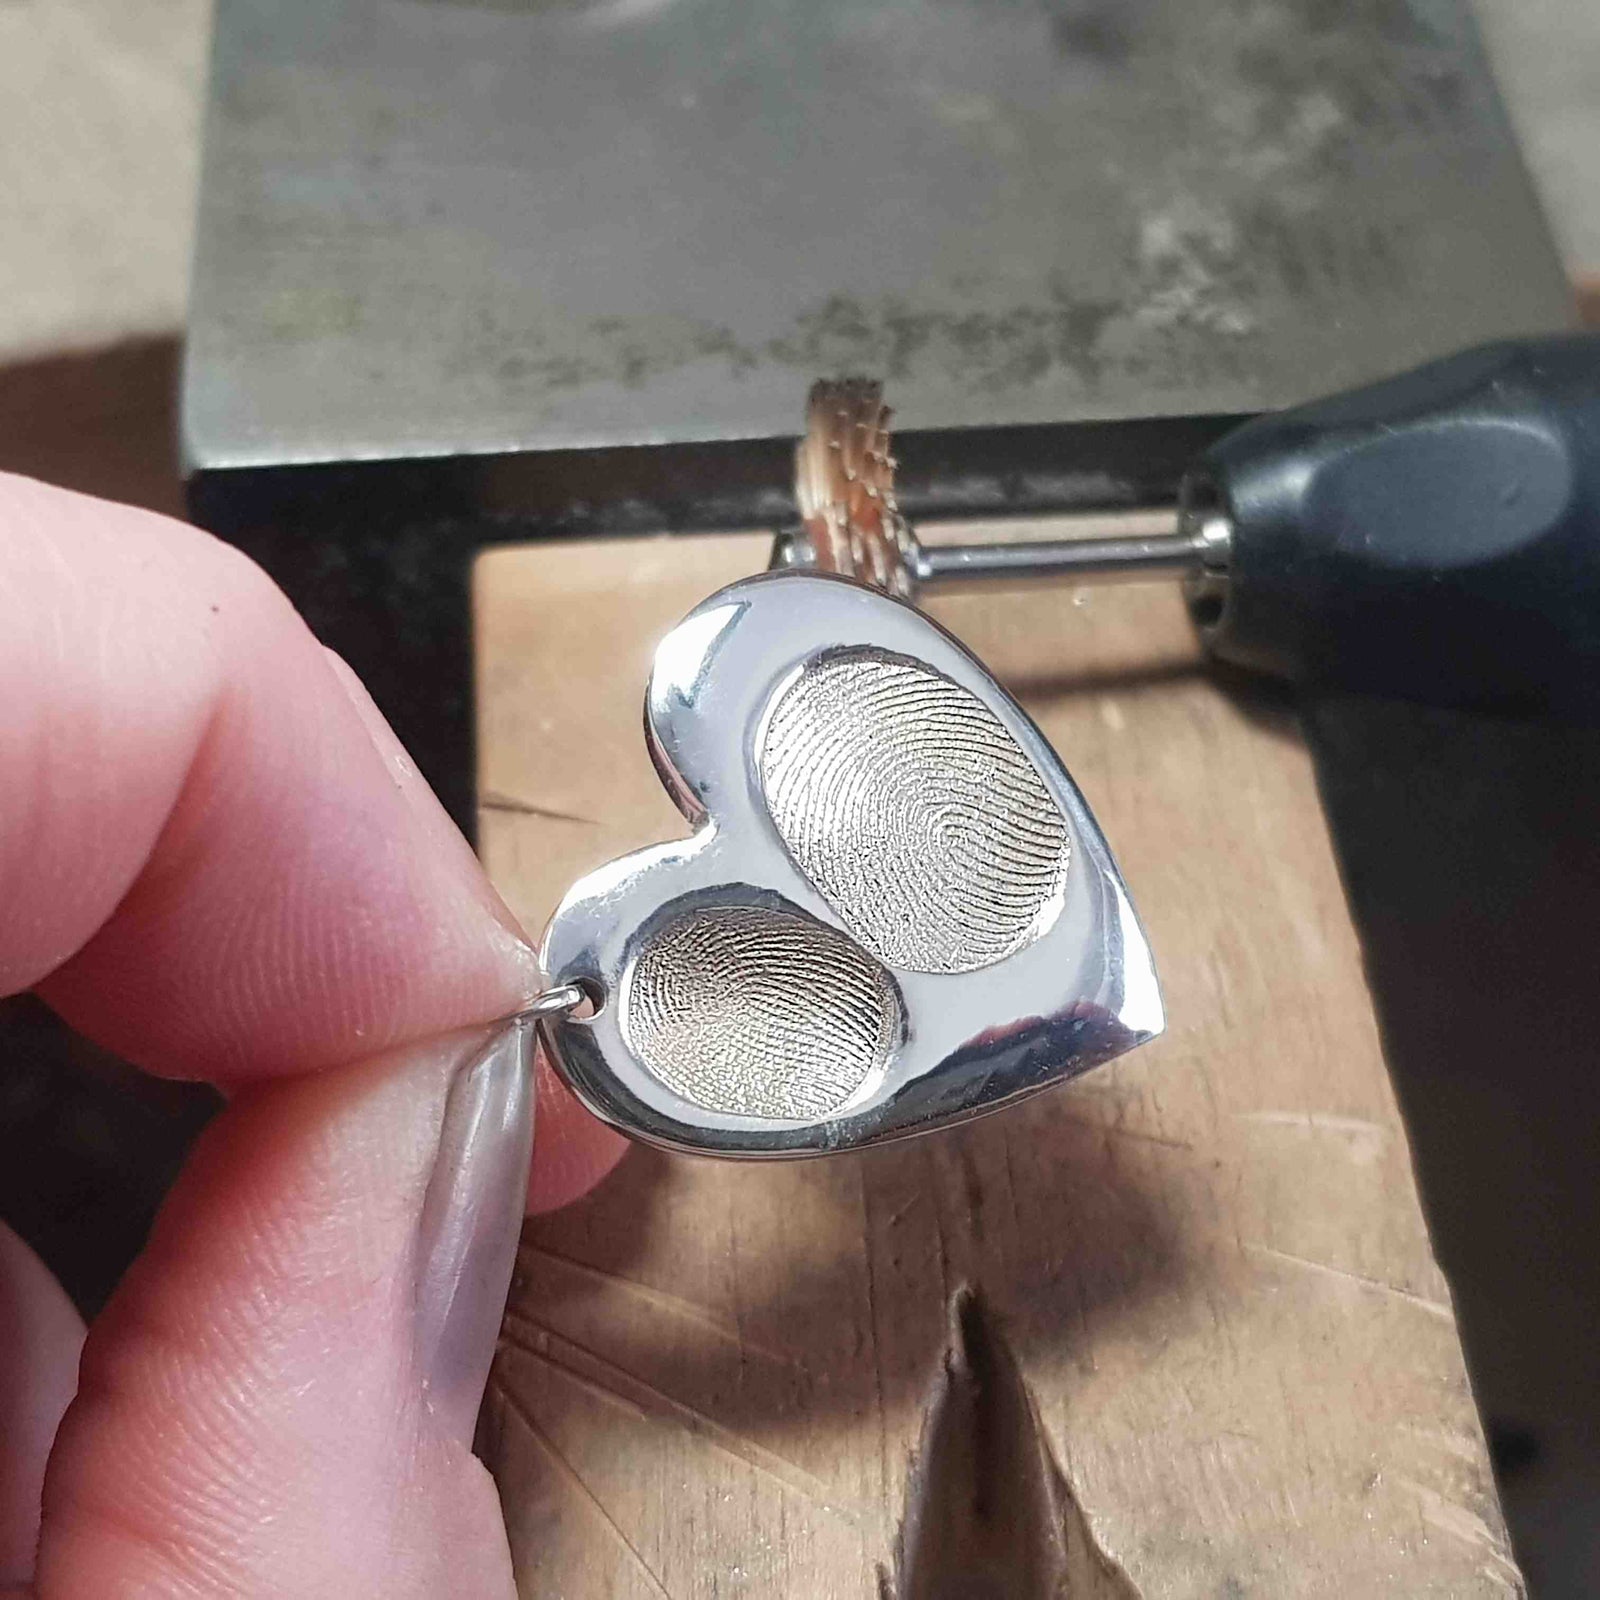
In the videos here, I am going to use a heart shaped cutter to make a heart shaped fingerprint necklace, but you can make just about any shape that you want. You don’t have to stick with the heart.
We will end up with a silver fingerprint necklace that looks a little bit like this.....
So, what is Silver Clay?
Silver clay is a fun and magical material that behaves in almost the same way as regular pottery or porcelain clay.
You can mould it and roll it and shape it and it dries out in the same way.
It’s relatively easy to use, it’s non-toxic, and you don’t need a load of expensive equipment to get started which makes it affordable and accessible for most beginners.
The big difference is, instead of being made of clay which is dug from the ground, silver clay was actually invented in Japan around 25- 30 years ago and it’s made of very fine pure particles of silver which are mixed up together using an organic binder.
When you make a piece of jewellery using silver clay, you have to fire it using a kiln, or in our case, a diy or kitchen creme brulee torch.
The torch is used to burn away all the organic binder leaving you with a necklace or a charm made from pure fine silver.
There are a lot of different types of silver or metal clay available, but for today, I’ll be using on called PMC Flex which is a firm favourite used by my teenage daughter – which illustrates how simple it really is.
It’s one of the newer Silver clay formulations and has lots of lovely benefits, like being softer and less sticky than some of the older clays. It also dries slower giving you extra working time.
This is probably the best thing about it, because having clay that quickly dries can be a bit of a problem when you’re getting used to using the clay for the first few times.
It does tend to dry out and start to misbehave if you handle it too much.
This tutorial is suitable for complete beginners so you don’t need to have any other jewellery making or crafting experience.
The tools and materials needed are all easy to find online and I will point you in the direction of all of those.
I have also included a small section right at the end about how to solder closed the little rings (called jump rings) that we will add to your necklace so that we can hang it from a chain.
I like to solder my jump rings to make sure they don’t come open.
I solder all of my jump rings closed because if a necklace is pulled, the jump rings can come open and then you could lose your necklace, but soldering does require additional tools and materials so you might decide against doing that last step. Which is fine and totally up to you.
So who am I?
My name is Lucille. I have been making fingerprint jewellery, mostly in gold for around 16 years.
I don’t usually work with silver clay, because I work with more traditional precious metals, but silver clay is something that I have bought my teenage daughter to get her started with her adventures in jewellery making and it’s been very enjoyable to work with.
If you have any questions at all, please feel free to ask absolutely anything and I will get back to you as soon as I possibly can.
The best place catch me is probably over on either Facebook or Instagram.
On Facebook my page is Sophia Alexander Gold Fingerprint Jewellery and on Instagram I am Sophia Alexander Jewellery.
So come on over, grab a cup of tea and have a chat. I’d love to e-meet you all.
Essential Tools and Equipment
One of the great things about working with silver or metal clay is that a lot of the tools you need to get started can be found around your house.
Today, I’m going to be showing you how to make a silver fingerprint necklace using tools that I have bought from UK suppliers, but I will provide you with a list of alternative tools.
- For instance, you will see me roll out the piece of silver clay completely flat so that it measures 2mm depth all over, using a set of plastic spacers – but, you can easily use 2 stacks of regular playing cards, stacking them up to 2mm in height.
- You will see me roll out the clay with a small, smooth acrylic roller – but you can pop down to your local DIY store and buy any small, smooth, rigid piece of pipe. It’ll be absolutely fine.
- And you will see me use a little tin of something called Badger Balm to lubricate my hands . This helps to stop the silver clay sticking, but there’s nothing to stop you using a little bit of olive oil – just never use Vaseline. Vaseline is terrible stuff for clay!
There are lots of alternatives for almost every tool I’ll show you.
So, what tools do you absolutely need to have that you can’t substitute?
- The first thing would be the silver clay itself.
Now, in this lesson, you will see that I am using one of the more modern silver clay formulations. It’s called PMC Flex and it does what it says on the packet – it allows for a much more flexible working time.
It dries slower than some other clays and gives you extra time to work – which is great!
As well as silver clay, you can also buy other types of metal clay - but bear in mind that some of these can’t be fired with a hand torch on your kitchen table.
Some will require a kiln which can mean spending hundreds, so make sure you read up on any clays you’re considering buying.
-
The second thing you will need is silicone moulding material.
This a 2-part silicone that comes in 2 different colours and you will need this to mold your fingerprints.
I’m using Siligum Moulding Compound which is blue and white, but I’ve seen different brands in all sorts of different colours, like yellow and green.
I don't *think* it matters that much but I stick with this one because it’s consistently reliable, it’s not greasy and it picks up detail well but there probably isn’t much different between them.
- The third thing you need is a shape cutter – now I know you “might” be able to find something around your house to cut a shape.
I’ve seen pieces made using bottle tops and all sorts of things but that can be quite tricky because you can’t see your clay through the bottle top.
If you’re making a flat sided necklace, like a square or rectangle, you could easily use any relatively sharp straight edge – I’ve seen people use credit cards, but none of these alternatives are going to make your life easy.
You’ll find that clay doesn’t like to be handled and played with too much, so you don’t really want to choose a shape cutter that means you make lots of mistakes and have to re-roll it a load of times.
- The fourth thing you need is a handheld torch of some kind.
A regular kitchen crème brulee torch will be absolutely fine, or something like mine, which is a DIY torch made by Dremel.
It can be filled at the bottom using a can of gas lighter refill which you will find in a supermarket.
You will need this to fire your fingerprint necklace, turning it from clay to silver.
Make sure your torch is not too tiny. You don’t want it running out of gas halfway through using it, but you don’t need a welding torch or anything.
-
The fifth thing you need is a fire block or charcoal block of some kind that you can safely place your fingerprint necklace on when you fire it so that you don’t set fire to anything.
6. Sixth and last, you will need a small silver jump ring so that you can hang your fingerprint necklace from a chain to wear it.
Jump rings need to be bought from a jewellery supplier but I will give you a link for those.
The full list of tools is a lot longer than that, but I will give you a complete list at the end, together with suggested UK suppliers.
If you are outside the UK, give me a shout in the comments. I do buy tools from overseas so I should be able to help.
How Do You Take Fingerprint Molds at Home?
Now, you can roll out your silver clay evenly and press your own fingerprint or a loved ones fingerprint straight into the clay.
This is a very direct method and if you are fingerprinting a very cooperative older person, or you really know what you’re doing, then it can work very well.
But, often it doesn’t go that way.
There is a certain technique in pressing a fingertip straight down into the surface of the clay, keeping it very flat and then lifting it immediately upwards that is harder than it looks and harder to perfect than you think.
I’ve known plenty of adults and definitely plenty of children who dig their finger into the clay at the top or the bottom or spoil the print in some other way.
If you take the fingerprint impression directly into the silver clay, you will probably end up having to reroll it and start over – which the clay won’t like you doing too many times.
With an uncooperative, overly interested, wiggly squiggly little person, you could end up re-rolling it a lot and putting your piece of clay straight into your scrap pot.
If you take the fingerprint in silicone and make a mould:
One: You can re-roll the silicone impression material around 3 times if your print isn’t great before you have to throw it away.
Even if you do have to throw a piece of silicone away, it’s a fraction of the price of your silver clay.
Two: Using a moulded fingerprint completely eliminates the need to have a second person, adult or child anywhere near your clay stage.
All you do, is take a small, equal size ball out of each container (about 2 grams each). Keep them separate to start off with because the silicone still start to set as soon as it’s mixed.
Make sure you don’t get the blue into the white pot and vice versa or you will contaminate your pots.
Once you have your two separate balls, working as quickly as you can, make sure they are thoroughly combined using your fingertips, with no streaks.
Roll them into a smooth ball with no folds or cracks and place the ball onto a hard flat surface, like a table, a small hard-backed book, or in this case, a plastic credit card.
Gently push the fingerprint onto the surface of the ball, keeping it completely flat. Then, lift it directly upwards in one, single motion.
You don’t have to hurry with this stage, but don’t rest the fingertip on top of the silicone ball for long enough or the finger could move and distort the fingerprint.
Place your fingerprint over to one side for 10-15 minutes.
The package says 5, but I always leave it a little longer just to be safe.
After the 15 minutes, you will find that the silicone still feels flexible but it has set hard.
A tip that I find really works – it’s much easier to fingerprint children when they’re in a deep sleep, but if that can’t be arranged, ask them to close their eyes or look in the opposite direction when you are pressing their finger into the moulding compound.
This means you will have more control over their hand.
I’m not entirely sure why that works, but it does stop them digging the tip of their finger into the silicone most of the time.
Making The Reverse Fingerprint Mold
Once completely set, take a little olive oil, or badger balm and apply the thinnest barrier layer over the fingerprint mould you have just made.
Take another small ball of white silicone and a ball of blue silicone.
The balls can be smaller this time. Combine thoroughly like before.
Make sure that there are no folds, pits or creases that will spoil your fingerprint and carefully press into your first mould.
Try to cover the whole fingerprint and keep it in an oval fingerprint shape or your final impression will look strange.
Place this to one side for 15 minutes and allow it to set hard.
Once set, carefully remove the silicone you pushed into your first mould and you will see that you now have a realistically oval-shaped 3-dimentional fingerprint impression that can be pressed into your rolled out silver clay without needing the fingerprinteeee to be present.
Place your original mould in a container to keep it clean and safe and dust free.
Silicone fingerprint moulds like this don’t really deteriorate very much, but it’s not a great idea to let them get dirty or damaged.
Problem Solving for Reverse Fingerprint Molds
Working with Silver Clay - Clay Tools (Full List)
Silver clay is always in its best state when it is first removed from a brand new packet.
It can of course be re-rolled, moulded , stored and reused, but it’s not a fan of being handled too much and it’s prone to drying out when left in the open air, so avoid too much of either.
Get all of your tools ready and assembled around you before you open the packet.
- You should have a small sheet of Teflon, or another similar non-stick work surface.
- You should have a set of spacers - I use 2 x 1mm plastic spacers on each side of the Teflon sheet so I can roll my clay out completely flat to a depth of 2mm, but you can use two stacks of playing cards. Just pile up a few to approximately 2mm in height.
It needs to be thick enough so that the fingerprint doesn’t poke out the back.
If it’s too thin, you could end up pressing it all the way through to the other side of the clay, but even if that doesn’t happen, you could distort the back of your necklace so it’s not nice and flat.
It’s not just that this doesn’t look great, it means that your necklace could end up being thin and fragile in the area of the fingerprint.
It doesn’t always pay to try and save money by skimping on clay.
3. You should have your small, acrylic roller or a piece of smooth acrylic pipe to roll the clay out with.
4. Your badger balm or a small pot of olive oil so you can lubricate your hands and anything else you need to lubricate to stop the clay from sticking.
5. The silicone fingerprint that you moulded earlier.
6. Your shape cutter. I’m using a metal heart-shaped sugar paste cutter that has nice crisp edges and no visible join.
It’s worth investing in good a quality cutter or a set of good cutters.
Very cheap cutters often have a very visible join in the metal that will show up terribly in the clay.
They can leave you will a horrible ridge on one side of your necklace and although it’s possible to tidy it up in by sanding it in the next stage, it’s a total waste of your time and clay and the edge often doesn't look 100% right.
7. You will also need a damp piece of kitchen tissue – not wet!!
Just damp enough so that if you give it a good squeeze, you shouldn’t be able to squeeze water out if it but it should be damp all over.
8. And you will need a little plastic bag or a piece of cling film.
These are both used to wrap up any left-over clay once you’ve made your necklace.
You first wrap it up in the damp tissue, then you wrap it in the plastic bag or cling film. You make sure you have removed all of the air and then you place the whole thing back into the original clay packet to stop it drying out.
The clay can be kept for a month of more like this but do keep an eye on it because it can still dry out. If you don’t keep an eye on it, you may come back to find a little solid silver clay rock.
How to Make Your Fingerprint Necklace - Working with wet Silver Clay
Now for the fun bit.
Set your Teflon sheet out in front of you on a table or hard surface.
Place the 2mm spacers or playing card stacks on either side.
Wash, dry and lubricate your hands with *a little* olive oil or badger balm.
Apply a tiny bit of oil or badger balm to your acrylic roller.
And apply a very tiny amount of oil or badger balm onto your shaped cutter so it’s ready to be used.
Always make sure you don’t apply too much because it can end up spoiling the surface and the edges of your necklace, but do make sure you get right into any difficult corners.
Take your piece of PMC Flex out of the packet and quickly massage it with your fingertips and roll it into a smooth ball with no creases or folds that would appear in your fingerprint necklace, spoiling the print.
Place it down on the centre of your Teflon sheet and quickly roll out the clay until it is completely flat and has a nice smooth surface.
Always stay on top of the spacers on both sides to make sure the clay is exactly 2mm deep all over.
Now, if you’re brave, or confident, or both, you can take your real-life person and press their finger straight down onto the rolled out clay.
Keep their finger completely flat, don’t allow them to wiggle their finger in any direction or dig it into the clay.
Then keeping their whole hand flat, lift it straight up off of the clay in a single upwards movement so the fingerprint is not distorted.
Or, if you want to have more time to work with (or less stress), use the 3-dimentional moulded silicone that you made earlier.
Simply place it very carefully onto the surface of the rolled-out silver clay and evenly push it down a little way.
Although you can’t actually see the fingerprint yet, you should be able to see if you’ve pushed it in enough to capture the whole fingerprint.
Don’t push it down too much! You’ll spoil the back of your necklace.
Pick up the Teflon sheet and gently flick the edge of the silicone fingerprint so it falls off leaving (hopefully), a perfect fingerprint impression in the clay.
If you’re not happy with the fingerprint, quickly re-roll the clay into a ball.
Make sure there are no creases or folds and start over, remembering to reapply the badger balm.
Silver clay does by its nature dry out and can become difficult to work with, so by all means experiment a little bit and have a few attempts, but you can’t realistically work the clay for hours without running into a ton of problems.
Take your shaped clay cutter and position it over the fingerprint until you are happy that it’s in exactly the right place. Don’t push the cutter down until completely you’re ready.
Once it all looks good, push the cutter down and remove the excess clay from around the outside of the cutter.
Re-roll the excess clay and immediately wrap it in your damp piece of kitchen tissue. Wrap this in your little bag or your piece of cling film and place this back in the original packet for safe keeping.
Remove the cutter in a single upwards motion.
So, now we have our wet fingerprint necklace in the middle of our Teflon sheet, but it’s not quite finished yet because we have no way to hang it from a chain once complete.
Take your Metal Clay needle tool or a needle, carefully position it and push it into the clay heart at the top, on the opposite side to the fingerprint to make a tiny hole which we will put a silver ring through.
We will use this ring to add the chain.
Don’t make the hole too close to the edge of your necklace. We are going to now make this hole a little bigger and you should ideally keep it at least 2mm from the outside edge.
This initial hole is not ever going to be big enough, so now we have to enlarge it without damaging the surrounding clay, so we do this gradually.
First, we take a 1.5mm drill bit and push it slowly are carefully straight down through the first hole twisting as we go and then twisting again as we remove it, so the clay doesn’t lift.
We then do exactly the same thing with a 2mm drill bit, twisting as we push it in and twisting as we pull it back out again.
When we fire our fingerprint necklace, the whole necklace including this little hole will shrink, so don’t worry if it looks a bit big.
You can of course also add a name to your wet clay using letter stamps.
These can be bought in a huge variety of styles and fonts from good jewellery supply stores.
Impressart stamps are lovely. You can get letter stamps to make names but also design stamps, so you can add little hearts and butterflies if your want.
About 3mm is about the right size, but I’m going to make another video for lettering or this class will be insanely long.
Your completed wet fingerprint necklace now has to be left to completely dry before you can move onto the next stage which is firing.
You *always* have to make sure it’s absolutely 100% dry before you attempt to fire it.
I’ll say it twice because this is *so* important. It’s crucial, crucial, crucial.
Trying to fire silver clay that is still damp can lead to all sorts of problems, not least ruining your necklace which could, bubble, crack or snap.
It can, in some cases even explode and fly around the room which is just dangerous.
PMC Flex takes longer to dry than some other metal clays purely because it’s designed to retain water to give you that extra working time.
It will not dry at normal room temperature, so don’t stick it on a windowsill and hope for the best.
So, to make sure you dry it completely, you can place it into a food dehydrator if you own one.
You can heat it gently with a hairdryer – but I wouldn’t recommend that because I’ve seen them go flying across a room.
Or – You can pace the whole Teflon sheet with your clay necklace, onto a flat baking tray into your conventional home oven.
The temperature should be 150 degrees Celsius, 300 degrees Fahrenheit or gas mark 2.
You should place it on a low down shelf and it needs to stay there for a minimum of 20 minutes.
A really old trick: To make sure your fingerprint necklace is dry enough to be fired, place it gently onto a shiny metal surface or a small mirror.
Let it sit there for a minute or so, carefully move it to one side and see if there are any signs of condensation where it sat.
Gently flip it over and repeat.
How to Make Your Fingerprint Necklace - Working with dry Silver ClayH
Once you are confident that your wet clay fingerprint necklace has completely dried, you can now tidy up the surface ready for firing.
I am going to use sanding pads or wet and dry sandpaper in different grades going from the most abrasive (something around 800 grit – which is actually quite fine), to ultra-fine, (something like1200 grit or even 2500 grit which you can often find online or in automotive stores if you can’t find it in your local DIY store).
I am going to gradually polish the surface of the clay until it looks super smooth.
You never, ever, ever, sand the fingerprint because you will sand it straight off. So just leave it alone completely.
The best idea is to put your own finger right over the clay fingerprint so that you can’t accidentally catch it with the sanding pad as you go around it because fingerprints can’t be fixed if you spoil them.
Please remember that this is a teeny tiny piece of fragile dry clay.
If you drop it or if you are too rough with it, it is likely to break.
It only becomes 99% pure fine silver once you have fired it and burnt away all of the organic binder.
- Place your Teflon sheet down onto a flat surface and sand your necklace over the top of it to catch all of the precious silver-clay filings.
Your sandings and filings can be saved and mixed with a little bit of water which you can then use to make filler (like polyfiller) to fill little cracks and do all sorts of other things so they’re pretty valuable.
- Take your 2mm drill bit and very, very carefully (think hardly daring to breathe, carefully), twist it into the hole you made earlier with the Metal Clay needle tool.
I do this to make sure the hole is big enough to add the little silver hanging ring – or jump ring later.
Then, sand ever so gently over the sides and the surface of the whole fingerprint necklace.
First use the most abrasive sanding pad or wet-and-dry sand paper, then work down through the grades, one at a time until you reach your finest sanding pad.
With wet and dry sandpaper, you probably want to start use 800 grit, 1000 grit and 1200 at a minimum. The finer the sandpaper , the better the final look.
If you can get your hands on 3M Polishing papers , all the better, because those things go from 400 grit all the way up to 8000 grit with no sharp edges. They’re amazing for this.
Don’t ever be tempted to miss out a grade or a step. It’s never worth it.
You will *always* be able to see fine hairline scratches if you do and you’ll never get a lovely mirror finish.
- Use the edge of your sanding pad or cut off little pieces of sandpaper and fold them into little V Shapes so that you can reach into any tiny little crevices like the centre of this heart which is pretty difficult to get into.
The only problem with using sandpaper as opposed to the sanding pads is that you can nick the clay because sandpaper is rigid and has quite a sharp edge, so just be super, super careful if you’re using sandpaper.
Nicks in the edges of your necklace are repairable at this stage, but they are an avoidable nuisance.
It’s one of the reasons why so many people prefer to use the pads or the 3M polishing papers – because they have soft backs instead of this hard edge.
How to Make Your Fingerprint Necklace - Repairs
Like I’ve just mentioned, nicks in your clay are a bit of a pain.
Sometimes, you might also find pits or hairline cracks in the surface of your dried necklace. A lot of this is down to the condition of the clay you’re using.
You can’t fix fingerprints full stop, so if you’ve got a big crack or huge nick in the fingerprint itself, you might decide you want to start over, but little imperfections on other parts of the necklace these aren’t the end of the world.
It’s perfectly possible to fix them using something called silver clay paste.
Now, you can buy paste or you can make your own from your silver clay sandings or filings.
Tip your filings from your Teflon sheet into a little glass jar or some kind of sealed pot with a lid.
I use a tiny Kilner jar which is actually designed for spices, but it’s a perfect size. Other jars which are also great are those miniature jam jars that you sometimes find in gift sets or in tea rooms.
Or, if you really want to, you can buy paste pots from good jewellery suppliers. These are small lidded pots with little sponges inside which you keep damp to keep your clay in good condition.
You can even buy ready-made paste!
Whatever you do, make sure you catch all your clay dust because it’s just so useful.
Now, taking a teaspoon, tip a few drips of water into the jar with the filings and mix with the end of the spoon or the end of paintbrush or something like that.
Continue to mix in the water until you have a thick paste – think double cream or the kind of buttercream frosting that you use to make little shaped swirls on top of cupcakes with.
You will often have to leave your mixture for a while so the clay can rehydrate.
Then, take a tiny paintbrush and very, very carefully and precisely paint the tiniest amount of water over the pit or the hairline crack in your necklace.
Next, paint on the tiniest amount of clay paste over the crack until it disappears.
The water is important because it helps the new paste clay to stick to the necklace – which is made of perfectly dry clay.
You will now have to set this one side to dry before you can sand the newly repaired section back again, but this should have now filled the defect, making it disappear.
If at all possible, you really want to avoid having to do all this.
It’s kind of a last resort rather than having to discard the necklace and put it in your paste pot, but it’s extra work and can mean that the piece is inherently flawed and weaker in the area of the defect.
Once completely sanded back with the finest sanding pad or sand paper, carefully dust off the surface of the fingerprint necklace to make sure no clay dust remains.
Turning Silver Clay into Fine Silver
The firing stage is where ALL the health and safety comes in because up until this point you haven’t really been able to injure yourself.
Well, now you can, so……
- Make sure you have put on your safely goggles.
- Put on an apron or a clothing cover – preferably something heat proof so that if you accidently ping your hot metal fingerprint necklace onto your lap it won’t burn through your clothes.
- Put on some sturdy, enclosed shoes or boots – for the same reason as before. Just in case you flick in onto your foot.
- Place your fire brick onto the centre of a steady, hard flat surface, making sure it can’t move around or tip anywhere.
- Put a digital timer to one side where you can clearly see it counting down.
- Have a bowl or a large mug of cold water immediately to one side.
- Have a set of tweezers ready to move your hot, fired fingerprint necklace from the fire brick to the bowl of cold water once the firing is complete.
One thing. An important Note – You don’t have to pick up your hot, freshly-fired necklace with the tweezers, so they won’t really get a chance to get hot, but, all the same …..
My own tweezers do have safe wooden handles to stop the heat from the hot fingerprint necklace travelling up the metal and burning my hands.
If you faff around and you’re using completely metal tweezers, they can get hot – which could potentially be dangerous so try and look out for a set like these.
Again, before you start …..
Completely fill your torch with gas. You don’t want it running out part way through.
If possible, draw the curtains or close the blinds.
This can help to fire your necklace in a darkened room because it makes it much easier to see the different firing stages and colour changes.
It doesn’t have to be pitch black, just a little bit dim, so you don’t have to wait until night time or anything. Closing the curtains will be fine.
Now you’re ready.
Quick note – you can only torch fire these necklaces because they are small. You will always need a kiln to fire large creations. You will also need a kiln to fire some other kinds of metal clay.
But this is only 2mm thick, smaller than a fifty pence piece and made of fine silver clay so torch firing is absolutely fine.
- Place your dried fingerprint necklace in the very centre of your fire brick and set your digital timer to 2 minutes.
- Turn on your torch and adjust it until you see a blue flame.
You need to use the end of the flame or tip of the flame.
- Wave that tip over the entire surface of your fingerprint necklace, keeping it quickly and constantly moving.
Keep it moving because otherwise there is a real risk that you will melt it! (Which is a terrible idea).
You will see a flash or small fire appear over the surface of your fingerprint necklace as the organic binder burns away.
Keep your face back!
As soon as that little flash of fire dies down, your piece will start to glow a lovely peachy colour.
- As soon as you see that peachy colour, set your 2-minute timer counting down, still moving the torch flame over the entire surface of the necklace the whole time.
Don’t freak out if it looks like your necklace is curling up slightly around the edges. It probably is. That’s quite normal. It’ll settle down flat again.
You HAVE to fire for full 2 minutes. That is a *minimum* firing time to ensure the fine silver in your necklace is completely sintered.
Sintering is where all those tiny silver particles inside your fingerprint necklace reach a temperature where they can stick or bind tightly together.
The silver in Silver Clay jewellery is always sintered which is why it’s different to the kind of silver you find in traditional jewellery on the high street.
Traditionally made jewellery is made from molten metal which is brought up to its melting temperature and poured into a mould where it sets solid.
The fine silver we create from silver clay isn’t quite as strong or robust as traditionally made silver purely because of the way the silver particles are joined together, but it’s still lovely and it’s perfectly fine for making keepsakes like this that won’t be worn all the time, every single day. In the shower, swimming in the sea and exposed to loads of wear and tear.
Jewellery made from silver clay can occasionally break.
Especially if it is dropped from a height or mishandled.
If your necklace does break (which you would have to be pretty unlucky), you will see that inside the necklace, there’s a kind of rough, stony appearance.
This doesn’t mean you haven’t made your fingerprint necklace properly or that you haven’t fired it for long enough – that’s a really common misconception.
What you are looking at, is sintered silver.
So, on the off chance that it’s run over by a car and it does break, the problem is probably not you. That’s just the nature of silver clay.
You can fire it for a little longer if you’re not confident it’s completely fired. It won’t hurt it (as long as you don’t melt it).
So, watch out. It needs to glow that lovely peachy colour. *This* is completely fine.
But watch out for anything that looks melty, shimmery or shiny - like the inside of a volcano. That would be bad. Stop.
Don’t ever fire for less time because it won’t be completely sintered, but definitely avoid bright, shiny, melting orange.
For Your Information.....
You might notice at this stage that your piece looks like it has shrunk a little bit – and that’s because it has.
It’s perfectly normal for PMC flex (and other types of PMC) to shrink up to about 12% of the original size.
This includes that little hole that we added for the silver jump ring, which is why we made the hole a little on the large side – because it will get smaller!
10. Once your 2-minute timer is up, gently poke your necklace into your waiting mug or bowl of cold water with the end of your tweezers.
You don’t have to pick it up with your tweezers.
Your necklace will hiss a little bit as the hot metal touches the cool water.
You can of course just leave it to cool naturally in the open air on top of your firebrick if you have the time and patience. I don’t.
Now, when you scoop it out of your bowl, you can gently tap it and you will be able to hear that it’s not clay anymore.
It sounds like metal – because it is now silver!
And now, you finally have a silver fingerprint necklace!
But it’s not quite as you imagined.
Polishing and Finishing Your Silver Fingerprint Necklace
Once fired, your fingerprint necklace will look dull, white and matt with a rough frosted surface.
It definitely won’t look like the lovely fingerprint necklace you imagined – just yet.
To make it look like a real piece of silver jewellery, you now have to sand it back again. Like you did in the dry clay stage, to polish the metal.
Now, when I say polishing, I don’t mean giving it a little rub with a duster.
I spend a huge amount of my life polishing gold and silver and I swear that’s what people think I do all day long.
For this kind of polishing, you will need the same grades of sanding pads or sandpaper that you used before.
I am going to use the different grades, again going from abrasive to ultra-fine, aiming to achieve a completely smooth, polished and shiny surface.
This process will now complete your fingerprint necklace, making it all shiny and silvery and ready to wear.
All that will be left to do, is to attach the little silver jump ring so we can hang it from a chain.
So, the very first stage after firing is to gently rub over the whole surface of your fingerprint necklace – front, back and sides with your most abraisive sanding pad because otherwise, it will stay white and chalky looking
Now, some people choose to *gently* (emphasis on gently) brush over the whole surface using a soft brass brush - The kind that you buy for cleaning suede and shoes.
And yes, once fired it is possible to brush over the whole necklace including the fingerprint in this way but you do need to bare in mind that you need to take care and be *gentle* (Just had to say that again).
You’re not scrubbing a frying pan. The silver is 100% more robust than the clay, but it’s not that robust. It’s not indestructible and you can scratch it.
Once you’ve brushed over your whole necklace, the surface will look like silver with a satin finish.
I'm actually not a huge fan of using brass brushes because even though they don't destroy fingerprints, in the right light you will almost always still see fine scratches left across the silver left by the brass bristles.
- Now, take your sanding pads or wet-and-dry sandpaper.
Start with your 800-grit sandpaper or sanding pad and move slowly over the whole surface, including the sides, but not the fingerprint.
Leave that alone now!
In fact, to make sure you don’t catch it accidentally with your sanding pad, pop a finger over the top of it to cover it completely and carefully work your way around the edges of it.
- Repeat this with all the different grades of sanding pads until you get to the very finest.
The more time you spend on this stage, the prettier your final necklace will be. It’s painstaking but total worth it.
Your necklace will progressively get shinier as you go.
Until finally, you have one beautiful silver fingerprint necklace. Just like magic.
Attaching your silver jump ring
Your necklace is now ready to hang it from a chain so it can be worn.
So we can do this, we pop one of these tiny 6mm silver jump rings through the hole we made earlier in the necklace.
You can use bigger jump rings if you like. I often use 8mm jump rings, but the most important thing is that you choose a jump ring made from approximately 1mm thick silver wire.
It needs to be strong enough to hold a relatively large fingerprint pendant, but it needs to fit through the little hole.
To attach the jump ring correctly, you will need to take 2 pairs of pliers.
- You will see that there is a little cut or join in the wire ring.
Position this join at the top and grasp the right side of the ring with one pair of pliers and the left side of the ring with the other set of pliers.
Twist gently to open the jump ring a little bit. You don’t need to go over the top and bend it too much or you’ll twist the wire out of shape and it will be impossible to neatly close it again.
- Push one end of the open jump ring through the hole in your fingerprint necklace.
Take hold of the jumpring with your pliers again in the same position and neatly twist it closed. You should hear a little click as it closes.
Permanently closing (soldering) your silver jump ring
Now, this is important.
I never, ever leave my jump rings like this.
Why?
Because, they can reopen again with wear and tear or if your necklace is pulled.
So, if you catch your necklace on something when you’re out and about, it could very easily open up and that’s your necklace gone.
And if you are the proud owner of small humans – this will inevitably happen.
To stop it happening, I routinely solder closed every single one of my jump rings.
But, soldering includes one more stage and it does mean buying a few more specialist items which can start to add up.
So, if you’re someone who’s going to keep their fingerprint necklace safely tucked away in a jewellery box, then this probably isn’t necessary, but if you do intend on wearing your necklace all the time, I would suggest that soldering is a good idea.
How do you solder silver?
To solder your silver jump ring closed you will need your fire brick and your torch again.
You will also need something called Silver Solder Paste, which is available from all good jewellery supply companies and comes stored in a syringe which you *must* keep sealed when you’re not using it.
You can easily find it online.
It comes in different three different types which all have different melting temperatures.
Easy being the easiest to melt at the lowest temperature, medium being halfway and Hard being the hardest to melt at the highest temperature
– so that’s easy to remember!
I usually tell people go for Easy solder paste when closing jump rings for one simple reason - You’re only soldering a tiny, thin 1mm jump ring. It’s not like it’s a bangle or a wedding ring.
You really don’t want to heat it for any longer than you have to - because you could melt it.
So, using the solder paste that melts at the lowest temperature makes sense.
A solder paste syringe lasts for ages and ages and you are only going to need the tiniest little bit, so buy the smallest syringe you can get hold of.
I go through quite a lot of it for my full time job and even I would never buy the biggest syringe because it has a bad habit of drying out and then it’s a pain to use.
Syringe solder paste comes ready mixed with something called Flux which is a substance that allows your solder to move or *flow* when it’s heated up to the correct temperature with your torch.
Flux helps the solder to flow over the join in your jump ring, permanently connecting the two ends of the wire.
To solder your jump ring closed, there are a few absolutely essential things you have to know:
- Solder cannot bridge or jump across gaps, so the two ends of your jump ring *have* to be touching. Tight. Like touching-touching.
- Your solder will not work if your jump ring is not 100% clean, free from grease, dust and debris.
This includes polishes and things you might *think* would clean it.
So, don’t do that!
The best way to make sure your jump ring stays clean is not to faff around handling it when it’s fresh out of the packet you bought it in, but…..
To make sure it’s totally clean, cut a small piece of wet and dry sandpaper in a very fine grade and gently sand the two ends of the open jump ring.
You need to be thorough, but don’t go crazy. You’re aiming to remove the dirt not the silver.
Don’t touch the jump ring once you have sanded it! Your hands naturally have grease on them even if you’ve washed them.
- Instead, use your 2 pairs of pliers, one on the left side of the ring and the other on the right, to twist the jump ring closed, so there is no gap at all between the two flush ends of the silver wire.
If you get this totally right, you will hear a little click as it snaps shut.
Health and safety first!
- Make sure you are wearing your enclosed shoes or boots, your heat-proof apron and your safety glasses. Tie any long hair back.
- Make sure you place your solder block or brick in the centre of a solid, flat and steady surface where you’re not going to knock it flying.
- Keep your face back from all the hot stuff and try to avoid knocking your hot necklace onto your lap or the floor. Once heated, the metal is perfectly capable of burning and hurting you, and also burning and damaging whatever else it falls on.
The second reason to keep your face back when you solder, is that you might see that the solder paste creates a minute amount of fumes.
These fumes are not deadly or anything but I’d strongly advise against sniffing them.
I usually crack open a window to provide some ventilation.
- Place your fingerprint necklace in the centre of your soldering block or your fire brick, like you did when you first fired your clay necklace.
Use your tweezers or pliers (not your hands), to twist the join in the silver ring towards the top. This is just so you can see it properly.
- Open your solder paste syringe and squeeze out a very tiny bit of silver paste. Like 1mm of paste. A really teeny bit.
Wipe the tip of the syringe and the paste over the top of the join. Just enough to cover the join.
Be as neat as possible. You definitely don’t want a big lump of solder paste it sitting there because that lump will be visible after you’ve soldered.
Not that that would be the end of the world, but why would you want it there?
- If you really have added way to much or if it’s in totally the wrong place and you need to remove some or move it, you can buy a tool called a solder probe, which is like a large needle with a wooden handle and you can poke your paste around a little and reposition it using that without contaminating it.
A large, clean needle will do the same job.
- Now comes the tricky bit.
Turn on your torch and adjust it until you see a blue flame. You need to use the end of the flame or tip of the flame like you did before.
Wave that tip over the entire surface of the jump ring, keeping it quickly and constantly moving.
Don’t only aim it at the blob of solder. You’ll just burn the solder and melt the jump ring. Not exactly the desired outcome.
Keep the torch moving because otherwise the jump ring will melt!
- Watch your jump ring and your solder paste VERY carefully. It will quite suddenly move or “flow”.
Now, this looks really pretty. Your solder paste will shimmer and look like it’s tuned to liquid silver as it melts and flows into the join.
As soon as it does this, stop your torch.
The join in your jump ring has now been completely and permanently closed.
- Gently poke your fingerprint necklace into your waiting mug or bowl of cold water with the end of your tweezers. It will hiss slightly as the hot metal touches the cold water but it will cool immediately and you can pick it up straight away.
Another Way to silver solder!
The other way you can solder your jump ring is with a tool called a Third Hand.
Now, a third hand can make your life easier because if you solder directly onto a fire brick, the fire brick will take some of the heat away from where you’re directing it, but it’s perfectly fine to use your fire brick for something as tiny as a jump ring, especially if you don’t want to keep buying things you’re never going to use again.
A third hand is a basically a useful pair of tweezers, held firmly into a solid base with a flat bottom like you can see here.
- Hold your fingerprint necklace up and clamp the bottom of the jump ring firmly in the tweezer part, making sure the join in the silver wire is pointing upwards so you can see it clearly.
Your fingerprint necklace will now be suspended in the air.
- You still need to solder over the top of your soldering block even with a third hand and again, make sure you have on your enclosed shoes, your heat-proof apron and your safety glasses.
Tie long hair back - Because safe is better than burnt and sorry.
- Open your silver solder syringe and squeeze out 1mm of silver paste.
Wipe it over the join in the jump ring.
- Turn on your torch and adjust it until you see a blue flame. Use the tip of the flame like you did before.
Wave the tip over the entire surface of the jump ring, keeping it quickly and constantly moving. You need to always keep it moving or you will melt the jump ring.
- As before. Watch your jump ring and your solder paste VERY carefully and wait for it to suddenly flow.
Pick up your third hand by the heat-proof solid base and dip your necklace into the mug or bowl of cold water.
Pickling
Once you have soldered your jump ring closed, you will probably notice that your necklace isn’t quite as shiny as before.
You will probably also see that the solder paste has gone a black or brown in colour and the jump ring may have changed colour too.
It can look a little scruffy, so, you’ll want to remove all of that.
To do this, we use something called Safety Pickle.
Safety pickle is made by adding Picklean Safe Pickling Powder, which can be bought at any jewellery supply store, to warm water.
The solution always works best when it’s heated, but not hot.
If you try to use cold water you may as well leave it and go off on holiday because it will take forever to get to work, so keep it warm.
It’s non-toxic and food-grade and biodegradable, so it’s reasonably safe to have in your house as long as you read the health and safety information and follow the instructions.
I have to say this, but Safety pickle is still a chemical – so wear your safety glasses, shoes and apron and tie any long hair back.
- I mix 50 grams of safety pickle powder per litre of warm water – just over hand-hot is about right.
So, it needs to feel warmer than air temperature on a hot day, but nothing close to boiling.
You’re not going to need anything close to a litre for what we’re going to do, so just mix up 200ml of warm water with 10g of safe pickling powder and let it dissolve.
- Now, if you’re making a few pieces or making lots of these and you are going to need to *keep* your pickle warm.
To maintain the temperature, you can put it into a little glass bottle or a jar and put it into a baby bottle warmer or, if you make up a slightly larger amount, you can pop it straight into a slow cooker.
I have a tiny 1.5 litre slow cooker that I ONLY use for jewellery making purposes.
- Carefully place your newly soldered fingerprint necklace into your Safety pickle solution and leave it in there for 10-15 minutes or until all that black/brown colour magically disappears.
- Then, mix up a teaspoon of baking soda with half a mug of warm water and stir until dissolved.
Remove your necklace from the pickle solution and pop it straight into the mug of baking soda water to completely neutralise any pickle on the necklace.
- Remove it and dry it with a soft cloth.
- Once you have finished with your pickle, don’t just tip it down the drain. It contains copper which is horrible for the environment.
Instead, add a tablespoon of baking soda to it, then a handful of cat litter which will completely soak up all of the liquid and set it to one side to dry out.
This can then be disposed of with your regular household waste.
- Finally..... Take your dry fingerprint necklace and your fine sanding pad or ultra-fine wet and dry sandpaper and repolish the surface of your necklace, completely avoiding the fingerprint.
This will bring your fingerprint necklace back to a high shine.
- To finish it off completely, take a soft cloth duster and rub your necklace all over with a good silver polish, or you can use Renaissance Wax like I have here.
And there you go. Ta-Da!
One completely finished, soldered, polished and ready-to-wear fingerprint necklace.
Just add a nice silver necklace chain.
Or, if you want to give it to Grandma or to someone special as a gift, you can buy individual pendant boxes from any good jewellery supplier or Amazon, or Etsy. Loads of places.
Conclusion
So, let me know how you get on.
I would absolutely love to see your fingerprint necklace creations.
Send photographs and let me know if you have any problems or if you’ve had difficulty following any of the steps included in this tutorial.
It’s always good to know where I can improve for future videos.
And it would be good to hear your ideas for future videos too!
Thank you for sticking with me to the very end.
Tools and Suppliers List (UK suppliers - get in touch if you are not within the UK)
How to make silicone fingerprint moulds:
- Siligum moulding compound (blue and white)
- Badger Balm (alternative - olive oil)
- Small pieces of card to take the fingerprint impressions on (helpful if you want to move them).
How to make a fingerprint necklace using silver clay:
- PMC Flex.
If you are careful, you should be able to make a necklace approximately the sizy of a 20 pence piece from a single 5.6g packet of PMC Flex clay - but it can be a little awkward to roll out such an tiny amount of silver clay in the exact shape you need and then perefectly place your fingerprint.
Most of the time it's *much* easier to work with a larger amount of silver clay.
You could buy 2 x 5.6g packets or just buy a larger packet that will allow you to easily make more than one piece of jewellery.
PMC Flex is available in 5.6g packets but also 16.7g and 55.8g packets (for if you really catch the making-bug and want to carry on creating).
- Small Teflon Sheet
- Plastic Spacers stacked to a height of 2mm (alternative - 2 stacks of playing cards).
- Small Acrylic Roller (alternative - small piece of smooth plastic pipe).
- Badger Balm (alternative - olive oil)
- Shape cutter - Sugarcraft or metal clay cutter
- Damp kitchen Tissue
- Small grip-seal plastic bag (alternative - cling film).
- Metal Clay Needle Tool (alternative - Large darning needle).
- 1.5mm and 2mm Drill Bits
- Clean, Flat Baking Tray
How to polish dry silver clay:
-
Wet and Dry Sandpaper in 800, 1000, 1200 grit + (You can find these in grits up to 2500).
OR -
Sponge Sanding Pad Set - 180, 220 and 280 grit.
-
3M Polishing Papers (400 grit up to 8000 grit).
- Scissors
- Small Teflon Sheet
- Air Tight Paste Pot (alterative - Kilner Spice Jar)
- 2mm Drill Bit
- Sharpie Marker
How to repair imperfections in your silver clay necklace:
-
Wet and Dry Sandpaper in 800, 1000, 1200 grit + (You can find these in grits up to 2500).
OR -
Sponge Sanding Pad Set - 180, 220 and 280 grit.
-
3M Polishing Papers (400 grit up to 8000 grit).
- Scissors
- Small Teflon Sheet
- Air Tight Paste Pot (alterative - Kilner Spice Jar)
- Small, Fine Paintbrush
- Small Pot or Mug of Water
- Teaspoon
How to turn silver clay into pure, fine silver:
- Safety glasses
- Enclosed shoes or boots
- Apron or other heat-proof clothing cover to protect your clothes
- Digital Timer
- Bowl or Mug of Cold Water
- Tweezers
- Fire Block or Brick
- Can of Gas Lighter Refill
- Handheld Kitchen Crem Brulee or DIY Torch.
- Teaspoon
How to polish and finish your silver fingerprint necklace:
- Brass Brush (optional - watch the video to see why!)
- Scissors
-
Wet and Dry Sandpaper in 400, 800, 1000, 1200 grit + (You can find these in grits up to 2500).
OR -
Sponge Sanding Pad Set - 180, 220 and 280 grit.
-
3M Polishing Papers (400 grit up to 8000 grit).
- Sharpie Marker
How to add a small silver ring to hang your fingerprint necklace:
- 7mm or 8mm silver jump ring (your ring needs to be big enough for whatever chain you choose).
- 2 sets of small pliers (chain nose, long nose, flat nose .... for very occasional use it honestly doesn't matter *that* much. Sprung pliers are infinetly easier to use!)
- Wet and Dry Sandpaper (800 grit).
- Scissors
How to solder your jump ring permanently closed:
- Safety glasses
- Enclosed shoes or boots
- Apron or other heat-proof clothing cover to protect your clothes
- Bowl or Mug of Cold Water
- Tweezers
- Fire Block or Brick
- Can of Gas Lighter Refill
- Handheld Kitchen Crem Brulee or DIY Torch.
- Teaspoon
- Easy Silver Solder Paste
- Picklean Safe Pickling Powder
- Mug or Container for Safety Pickle
- Bicarbonate of Soda
- Mug or Container for Bicarbonate of Soda Solution
- Cat Litter for Safe Dispoal of Pickle.
- Soft polishing Cloth
Leave a comment
Comments will be approved before showing up.
Subscribe
Sign up to get the latest on sales, new releases and more …
Join the Club
WE'RE SO PLEASED TO SEE YOU!
Stay a while and look around.
While you're here, why not subscribe to our newsletter?We'll give you £20 off your first order, VIP access to new products, and access to our very special sample sales.We promise not to annoy you (honest).